It’s been possible to run Linux on Windows for a few years now. Windows Subsystem for Linux (WSL) was released in 2016, allowing native Linux applications to be run from within Windows without the need for dual boot or virtual machine. In 2019 WSL2 was released, providing a better architecture in terms of the kernel and improving the native support. A few weeks ago, Microsoft and NVIDIA announced GPU support on WSL2 and the potential for CUDA accelerated ML on Ubuntu from within Windows. Before I dive into this in detail, I want to take a quick aside into why you might want or need to do this…
A few years ago I wrote a post about using laptops for deep learning and my opinion was (and still is) that you are better off getting a Dell XPS and installing Ubuntu. That way you could always have a local GPU and an environment that mirrors the servers your code would be deployed on (even if your models had to be a little smaller). I stand by this.1 However, at the time, I was contacted by a few people who said that they had a choice of Windows or Mac due to company policy.
Just like when I was looking for a good development laptop back in late 2016 and all I could find were snarky comments that all you need is a mac to remote into a server or “just get a desktop”, I felt that there was a gap that wasn’t being addressed for individuals who literally had no choice. It’s frustrating to turn to the technical community for help and rather than having your questions answered, get unhelpful suggestions that just don’t work for your situation. So I’m here to help 🙂
Why would you need to use this?
The main reason would be company policy. If you are looking for a personal device, go for a Linux install on an XPS. If you need Windows at home (for gaming or school work or whatever else) then go dual boot. There are plenty of guides out there. So this means that the main reason to use this would be if you only had the choice of a Mac or Windows. Why would a company do this? Mainly security. There are applications to remote wipe Windows and Mac devices, manage software updates, VPN software etc, that are not just available for Linux systems. I’ve had problems with this with some companies in the past and fortunately I’ve been able to convince them to make an exception.
As GDPR and data security has rightly become more important to companies, the control they want to exert over their hardware has also increased. After years of bring your own device policies there are now many companies where you have no choice over your kit. So let’s assume you are in that situation. You have the choice of a Mac or Windows laptop. Most developers would go for the Mac. However, if you want to develop in Linux and comply with company policy, you now have another option.
So what is WSL2?
Windows Subsystem for Linux (WSL) is an optional feature of Windows 10 allowing Linux programs to run natively on Windows via a kernel compatibility layer based on Ubuntu. WSL2 (released in June 2019) extended this to a real Linux kernel through Hyper-V (virtualisation layer). If you keep Windows up to date then you will have access to both WSL1 and WSL2 already, but will need to activate them for use2.
What’s the difference between WSL and a container or virtual machine? In a nutshell it’s the native running. Your WSL Ubuntu has access to the full resources of your machine and the file system. It’s also pretty performant with WSL2 running close to bare metal Ubuntu 20.04 across a range of benchmarks. VMs can provide the performance but not the native running. Finally, if you want GPU access on a laptop, you can’t get this (currently) with VMware – only the powerful GPUs are supported for pass through. As of June 2020, you can get native Linux apps and your laptop GPU exposed for ML so you can develop in Ubuntu3 and run your code locally as if you had a Linux machine, while still complying with your work security requirements.
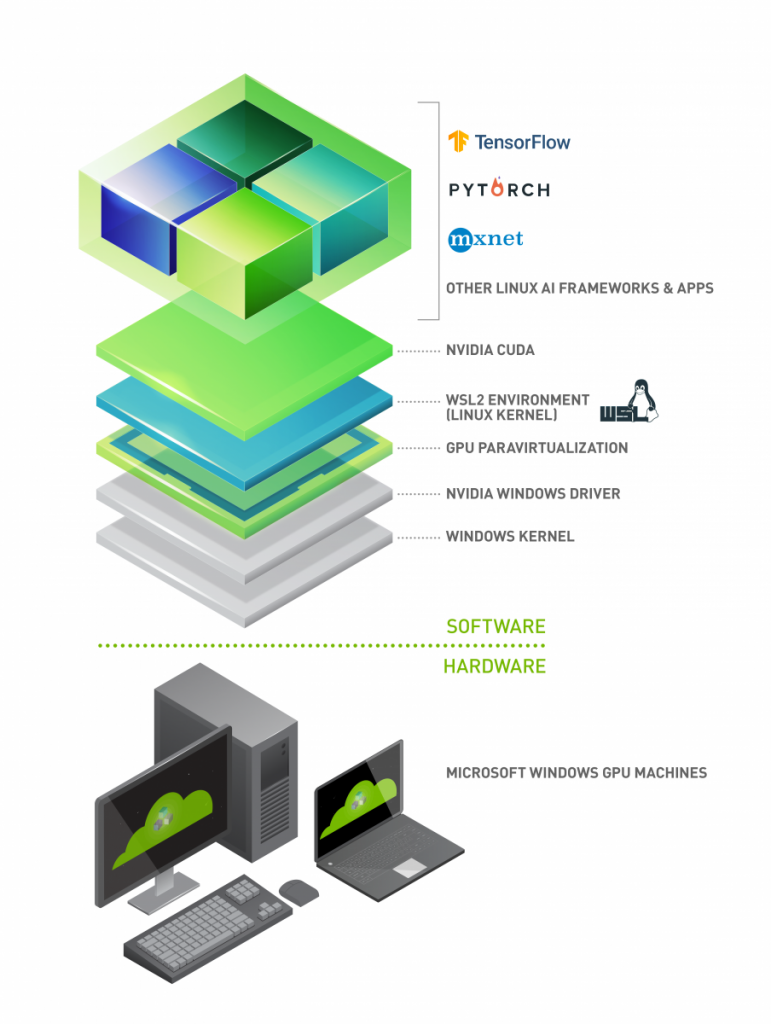
The new version of WSL2 and corresponding NVIDIA drivers expose CUDA and GPU from Windows to the Linux environment. This means you can run your favourite ML frameworks within Windows and have them running at GPU speed. If you’ve got one of the latest Dell XPS with an NVIDIA GTX 1650 this is fantastic. While there are plenty of other options, CUDA support in WSL2 has been the number 1 requested feature in the past year – there’s definitely plenty of people who are unwilling or unable to go for dual boot, VMs or even a dedicated Linux machine.
Getting set up
There are some great guides out there and I’m not going to just write something almost identical, but instead draw attention to some gotchas. At the time of writing, the version of Windows you need to enable GPU pass through is only available in the Windows Insider program on their least stable release. This is not recommended unless you’re the sort of person who regularly commits and pushes their work, keeps separate backups of everything important on somewhere other than their machine, and can generally cope with the random BSOD4. It goes without saying you should create a backup ISO of your system (or ask your friendly company sys admin to do this as they’ve probably locked down USB access too 😉 ).
Register for the Windows Insider and NVIDIA developer programs to get access to the software you need. Follow the blog released by NVIDIA. While it’s not completely clear, make sure you have the 20.04 version of Ubuntu installed when you are asked to install Ubuntu from the store. This does not appear to work on 18.04.
Make sure you don’t try and install any of the other cuda packages than the toolkit. If you do, it will install a different NVIDIA driver within WSL2 that will prevent CUDA access. This is difficult to clean up (just google for removing NVIDIA drivers in Ubuntu) so if you do this, the easiest fix is to uninstall the Ubuntu distribution and restart from that point.
If you follow all the instructions in that blog post you will have a system that works. If you’ve only ever worked in Python and have never compiled anything in C then the testing steps are not obvious. Navigate to the samples locations and you will see all the samples. These will not run directly. Build them using [make/] – this may require sudo:
cd /usr/local/cuda/samples/
sudo make
Building the samples will take a few minutes and spits out lots of warnings and a few errors. The warnings are mainly deprecated features and the errors appeared to be code errors rather than a lack of libraries, which just meant a few tests would not run. I can’t recall the last time I ran these tests on “bare metal” Ubuntu so couldn’t honestly say whether they should all work!5 At this point go into the folder with BlackScholes and run it. If this can see your GPU then you’ll get a bench mark. If it can’t then try stopping and restarting Ubuntu and trying again, and then if it still doesn’t work reboot your Windows machine. If there’s still no joy then you will have to uninstall and start again. This does work but only if you follow the steps exactly.
BlackScholes benchmark works? Congratulations, you have access to the GPU and all your other GPU enhanced code will work. Feel free to continue and follow the docker install steps if you need to.
The nvidia-smi tooling does not seem to work directly from within Ubuntu in this set up so you will need to set yourself a short cut on the desktop to view it.
I would recommend that you include your Ubuntu system in your back up regimen including any ssh keys you create. If you spend a while setting up your Ubuntu development environment then it’s essential to have a back up in case you have system instabilities on this early release version, or if you mess up your graphic driver install to break the GPU pass through and need to uninstall Ubuntu to fix it. As I write this, I’ve had 2 weeks on the 20151 build from the dev channel (previous the fast ring) and only had a single green screen which was unrelated to WSL2 and caused no data issues.
In conclusion, if you have a Windows machine and are curious (or indeed the sys admin of a company where this might be needed) then get this downloaded and try it out. If you are currently restrained by security and need a solution like this then try it out on a personal machine first before taking it to your friendly IT person as a preference. This is a great step forward for being able to develop ML on Windows and I’m really excited to see this becoming available in the standard releases soon.
- The latest XPS is a thing of beauty. ↩
- I’m not going to link how to do that here as you can make life difficult for yourself with the GPU set up. ↩
- Using vim obviously 😉 ↩
- Although on the preview these are actually green screens 😉 ↩
- Like most people I generally install and if I can see nvidia-smi output then I’m good to go 😉 ↩